Using Mapproxy to cache and host both online and offline basemaps (Basemap series Part 5)
Here we go again
In this post now I will continue about how to simultaneous host and cache basemaps, either from online or offline sources.
First, If you want to just use online basemaps to be available or hosted on your favorite protocols (like serving google Street Map to WMS or ArcGIS REST service) you could use Portable Basemap Server. I have previously covered it, check this LINK.
If you want to only cache the tiles to be used for offline needs, you can use MOBAC or SasPlanet.
Now if you want to have capabilities like both serving basemaps directly to your user using client server services protocols (either online or local online or even pure offline situation) while maintain online access, plus adding caching capabilities (useful if you want your application to be as fast as possible), you can use MAPPROXY.
It can do what PBS can do plus it has caching ability, so you wont have to worry if your internet networks get troubled, because the generated caches will serve as backup renderer. Basically it is combine PBS, and offline cacher like MOBAC or Sasplanet.
Now about the procedures:
1. Install mapproxy using python PIP from their official page.
2. You are python blind, dont worry this SITE provide you offline installer (install it as windows services for your convenient). Because the program will have their own webserver, beware of Port Conflict, make sure you choose unused HTTP PORT on your server/computer.
3. Now deep down to settings, make YAML configuration file. The structure of the code will looks like this
4. The above YAML config file is dedicated to serve google image to your clients. Refer to this LINK for documentation. The most important things is, you must know the exact tile query URL of your target basemap providers.
5. Now save the YAML to directory C:\ProgramData\Mapproxy
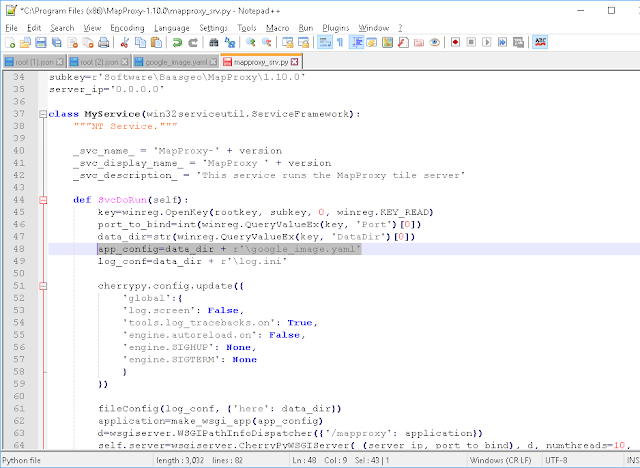
6. Next, open the mapproxy_app.py or mapproxy_srv.py in C:\ProgramFiles(x86)\Mapproxy, and change the app_config line to your created YAML file.
7. Load up the mapproxy by launch it from CMD from the program files directory, like this (dont forget to run as administrator to avoid denied access error).

8. or from Windows Services (when it installed as services). Load the windows services from Control Panel or windows search tool at the taskbar and type "services",

9. Open browser and check if the webserver has been running, the typical URL is localhost:port/mapproxy/demo. In this page, you will see all the capabilities and protocols and endpoints of the map services. From this point, you can starts to seed the services to your GIS desktop, WebGIS, mobileGIS whatever.

10. A sneak peek.

Basemap is not so myths after all,
Stay Tuned
In this post now I will continue about how to simultaneous host and cache basemaps, either from online or offline sources.
First, If you want to just use online basemaps to be available or hosted on your favorite protocols (like serving google Street Map to WMS or ArcGIS REST service) you could use Portable Basemap Server. I have previously covered it, check this LINK.
If you want to only cache the tiles to be used for offline needs, you can use MOBAC or SasPlanet.
Now if you want to have capabilities like both serving basemaps directly to your user using client server services protocols (either online or local online or even pure offline situation) while maintain online access, plus adding caching capabilities (useful if you want your application to be as fast as possible), you can use MAPPROXY.
It can do what PBS can do plus it has caching ability, so you wont have to worry if your internet networks get troubled, because the generated caches will serve as backup renderer. Basically it is combine PBS, and offline cacher like MOBAC or Sasplanet.
Now about the procedures:
1. Install mapproxy using python PIP from their official page.
2. You are python blind, dont worry this SITE provide you offline installer (install it as windows services for your convenient). Because the program will have their own webserver, beware of Port Conflict, make sure you choose unused HTTP PORT on your server/computer.
3. Now deep down to settings, make YAML configuration file. The structure of the code will looks like this
services:demo:tms:wms:md:title: Google MapProxy WMS Serverwmts:kvp: falserestful: truesources:google_image:type: tileurl: http://mt1.google.com/vt/lyrs=s&x=%(x)s&y=%(y)s&z=%(z)s&s=Galileogrid: grid_webmercgrids:grid_webmerc:base: GLOBAL_WEBMERCATORgrid_merc:base: GLOBAL_MERCATORcaches:cache_google_image:grids: [grid_merc]sources: [google_image]cache:type: mbtileslayers:- name: layer_google_imagetitle: Google Satellite Mapsources: [cache_google_image]globals:image:resampling_method: bilinearjpeg_quality: 90
4. The above YAML config file is dedicated to serve google image to your clients. Refer to this LINK for documentation. The most important things is, you must know the exact tile query URL of your target basemap providers.
5. Now save the YAML to directory C:\ProgramData\Mapproxy
6. Next, open the mapproxy_app.py or mapproxy_srv.py in C:\ProgramFiles(x86)\Mapproxy, and change the app_config line to your created YAML file.

7. Load up the mapproxy by launch it from CMD from the program files directory, like this (dont forget to run as administrator to avoid denied access error).

8. or from Windows Services (when it installed as services). Load the windows services from Control Panel or windows search tool at the taskbar and type "services",

9. Open browser and check if the webserver has been running, the typical URL is localhost:port/mapproxy/demo. In this page, you will see all the capabilities and protocols and endpoints of the map services. From this point, you can starts to seed the services to your GIS desktop, WebGIS, mobileGIS whatever.

10. A sneak peek.

Basemap is not so myths after all,
Stay Tuned
Comments
Post a Comment